Editing your products

Edit the details, information and settings for your product
When you click to edit a product from your product management hub you will be taken to a page where you can edit all of the information and settings for that product. Here you will find a complete list of the available features that you may be required to edit. This may vary depending on the requirements and display of your website, so we'll cover all of the bases here of what the features are and how they are used;
On the editing screen you will see the main details to be edited along with a menu of additional settings including images, product options, related products and so on. Lets first take a look at the main editing details here;
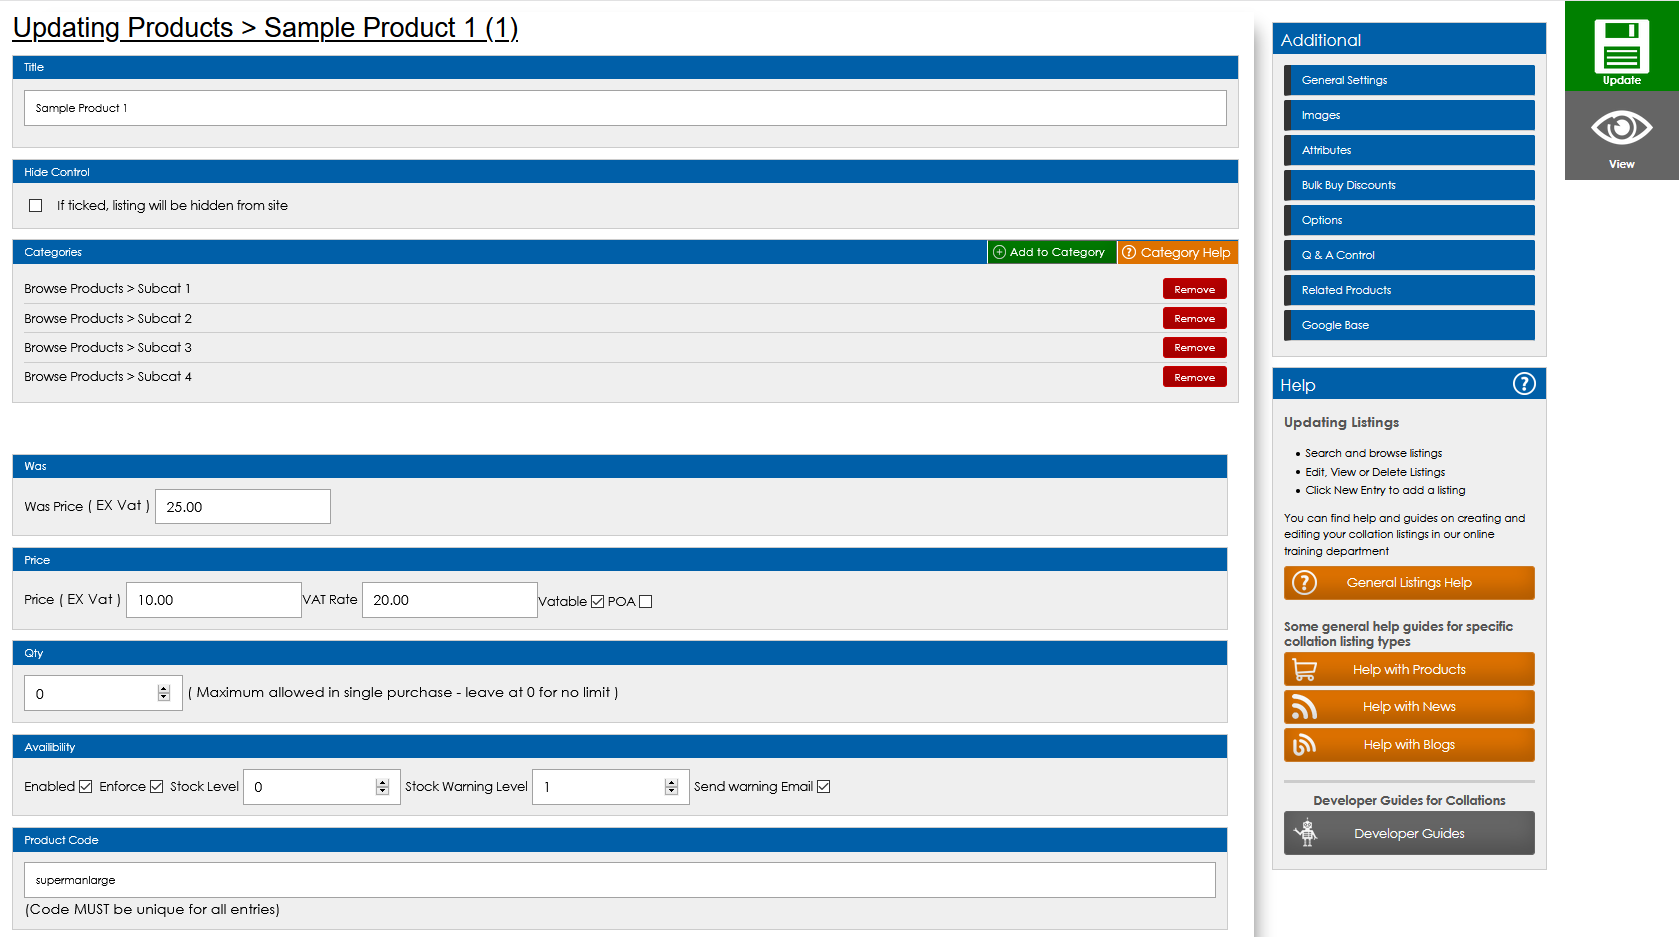
Create a unique, keyword rich title for your product to clearly comminicate the product to search engines. This title will create the URL for the product on your website as well as the main title that will be displayed when a user visits the page.
A simple tick box allowing you to hide your product from your website users whilst keeping the entry in your database. If a user tries to visit this link while hidden they will be met with a custom 404 message. Simply untick and save the product to make this product accessible to site users again.
Your products should be divided into categories to help your users browse through. Here you can add your product to the relevant categories by clicking "Add to Category". You will then see a popup menu with the available categories.

In the pop up menu, you will have a search box to find the relevant category you would like to add the listing to. Or you can browse through your categories in the available list. Any categories that have sub-categories will have an "Expand" button next to them so you can click to view these also. Simply click select to add to a single category, or to add to multiple categories at once, simply tick the relevant boxes and click "Add All Checked".
Important Training Note: You must create the categories in your admin before you can add products to them
The "was" price is to display to a user the previous price that the product may have been listed at, to indicate a current reduction in price. It generally displays in the area of the current price to act as a sales driven comparison. If no "was" price is entered it will not be displayed on the product page.
Enter the product purchase price (ex VAT). This is the price that the customer will pay when purchasing the product. The VAT rate will default to 20%, and you can tick to set whether or not the product is VATable. Your developer will set the way in which your price displays on your product pages. This can display as the total including VAT or with out, then at the basket or checkout stages, the VAT breakdowns can be displayed for the customer. You also have the option to set a product to POA allowing users to simply send an enquiry about the product rather than purchase online. If this is ticked the purchase options will not be shown, and a form will be in their place allowing the user to submit an enquiry.
Different from stock control, this feature allows you to limit the number of this product that can be purchased in any single transaction, if required. Leave as 0 if their is no limit, or simply enter the number to limit the number of this product allowed in any single transaction.
Set a unique product code for each listing in your online store. This product code will be referenced on itemised invoices through your system. All product codes in your product database MUST be unique.
Your stock control management allows you to set the number of each item you have available for purchase via the website.
Tick "Enable" to use stock control for this product - this means internally your system will monitor the stock for this product. Please note, although enabled, the product will still be purchasable when out of stock unless "Enforce" is ticked.
Tick "Enforce" if you would like your system to display an out of stock message to be displayed on the product when stock is at 0, and to prevent the product from being purchased.
You may also set a stock warning email notification which will be triggered to you when the stock for the product reaches a certain level. To do this, tick "Send warning email" and in the Stock Warning Level, enter the level at which you would like the notification email to be triggered. If you set this to 10, the email will be triggered to you to notify you the stock has reached 10.
The product weight is used for your delivery management.
Setting the product to shipping exempt will ensure the product is not subject to the shipping costs defined in your delivery management. If your delivery management applies costs based on the weight of the products in the basket, you must enter the weights of the products so the system can calculate the total weight. Weight should be entered in kg. So a 100g product would be 0.1
Add a brief overview of your product to display to users when browsing through your categories or search results. General this will not be displayed on your main product page, only when the product is in the category preview.
Add a full description of your product, communicating to your consumers all of the relevant details and information.
The File Attachments feature allows you to upload files in PDF, JPG, PNG format to allow users to download these to their own device direct from your website. Simply choose the file you would like to upload, give this a name and this will be added to the product and available for download. This feature also allows for purchasable product attachments if users are buying files such as e-books, audio files and so on. This makes the file available in their account area for instant download after purchase.
If you would like to restrict visibility of your product you can use your content access controls. To do this simply choose how you would like to restrict the page by selecting registered users, user groups and even individual specific users. Once you have done this, any person that tries to visit the page on your website that does not fit the specified criteria will be directed to a relevant response message to inform them why they are not able to view the page or how they can gain access. A useful tool for encouraging users to register to gain access to specific content or to preserve certain content for particular users.
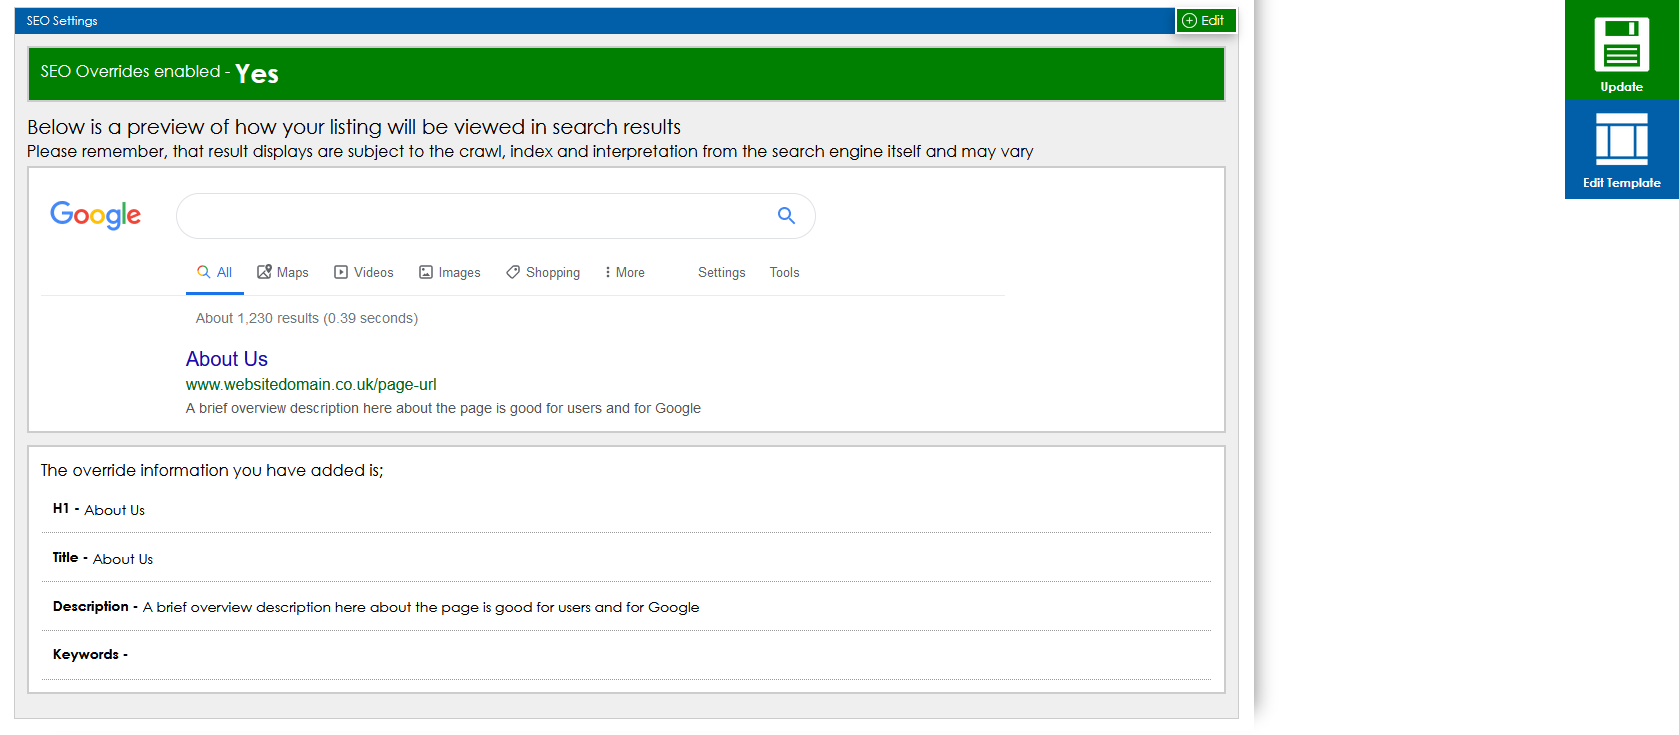
The SEO Overrides button allows you to create custom Title Tags and Meta Descriptions. There are a number of important SEO controls available for every product on your website for targeted SEO Campaigns. By default, the CMS will use the Page Titles and first part of your on-page content as the SEO Data that Google will read, however, you may wish to override this using this feature. The CMS will also give you a preview of how your result will appear in search engines once indexed. To activate and use your SEO Overrides for your page simply click the edit button which will open the overrides pop up. Tick "Enable" to activate and then you can fill in your data and settings as required.
This dropdown allows you to choose which outer template your page should use. You may have various sections of your website that have different styles/formats and this tool will tell your page which of those sections to use for its outer template. This tool is used only for websites with multiple templates available. At the time of your website development, you will be advised if you require multiple outer templates. Please contact us if you are unsure about this feature.


In the side menu you will have a series of other settings and options. Let's take a look over some of these features;
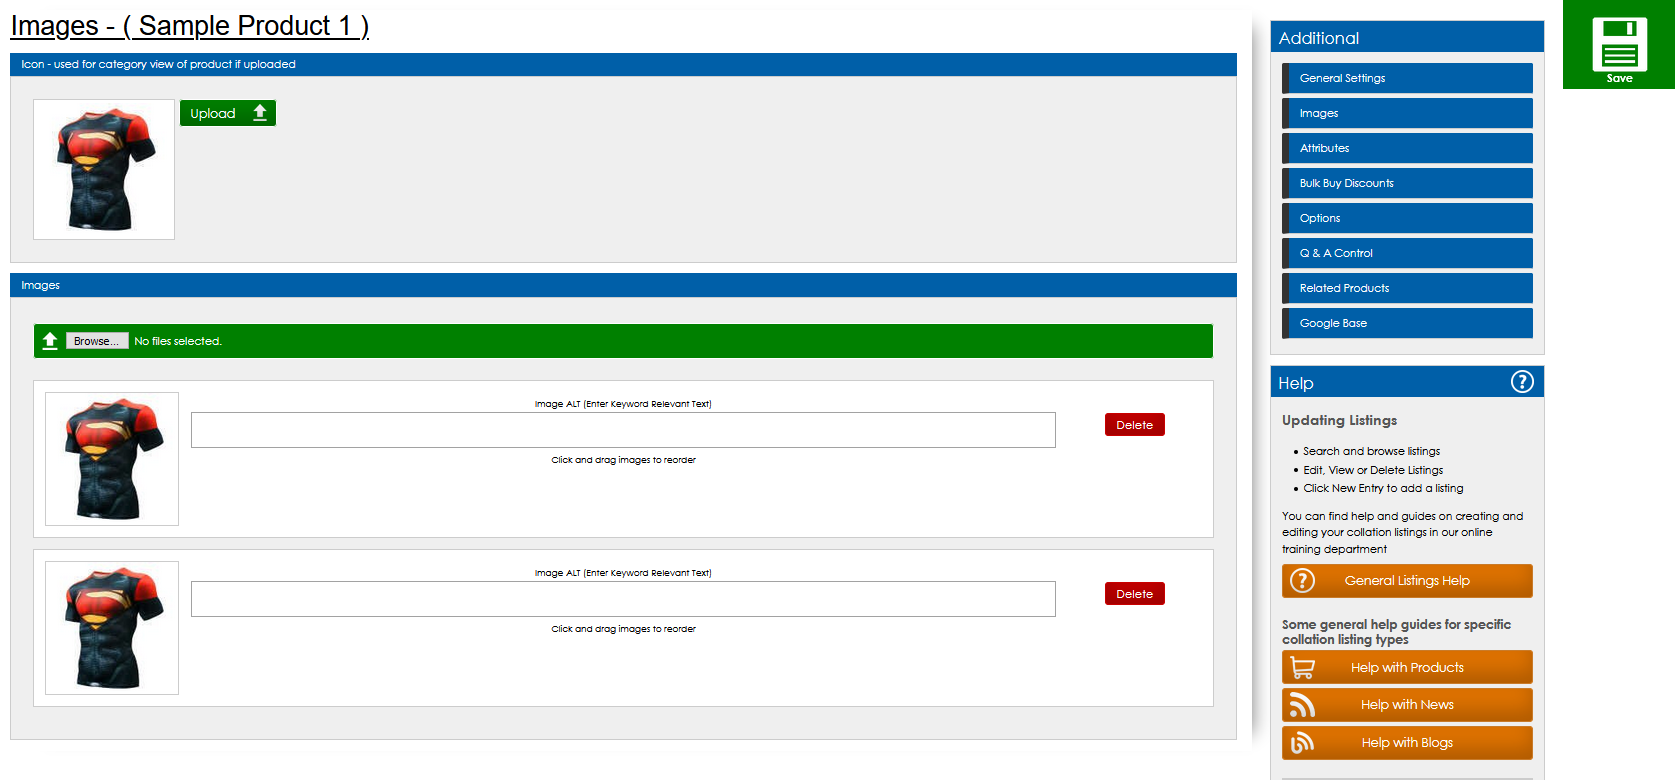
When you click the images tab in the "Additional" menu you will see first an options for the "Icon". This will be displayed in the category view of your products when users are browsing your website. The recommended image size will be displayed here, allowing you to browse and upload an image from your device to represent your product.
You will then see the section for your main images which will display on the product page itself. Upload multiple images to showcase your product to display in a gallery, slide or zoom format. Set ALT tags for each of your images and drag and drop to reorder the display. The style and design of your product images will have been preset by your developer, however this can be changed if required. You can view relevant tutorials below.
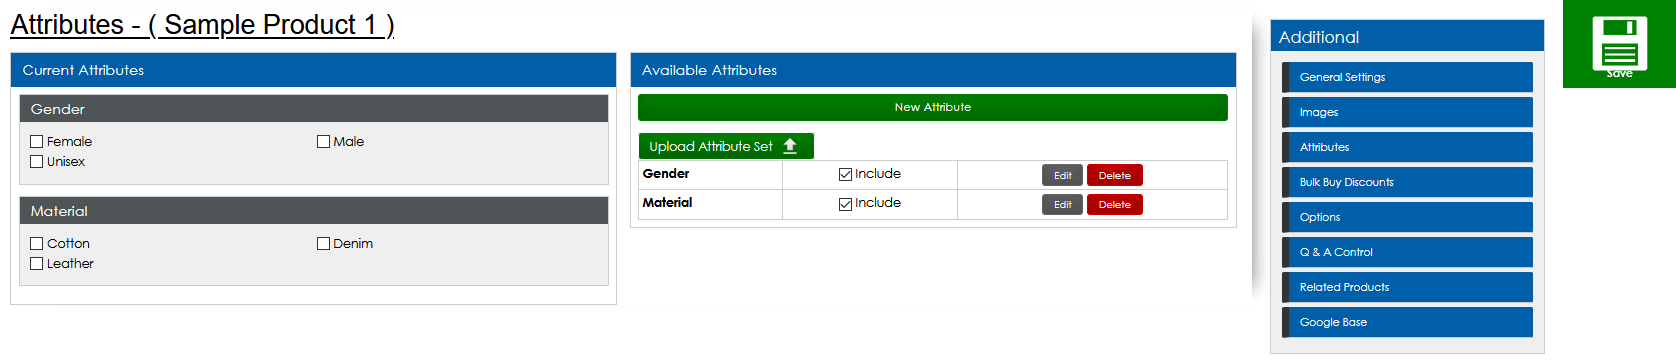
Create and assign your products to sets of attributes that define information about them. These attributes can be used for display only or in conjunction with search filters to allow users to find exactly what they are looking for in high volumes of products quickly and easily. Simply click on the Attributes tab, tick the relevant attributes which apply to this product and click save to update. From this interface you can create new sets of attributes to apply, upload images to display with them and edit existing attribute sets. An example of attributes might be the material type for items of clothing. The attribute name would be material type, with the options being Cotton, leather, denim etc. You can tick multiple attributes if more than one option applies to a product. When conducting a search or filter, any products with the searched attribute will be returned in the results. You can find a full guide for product attributes below.
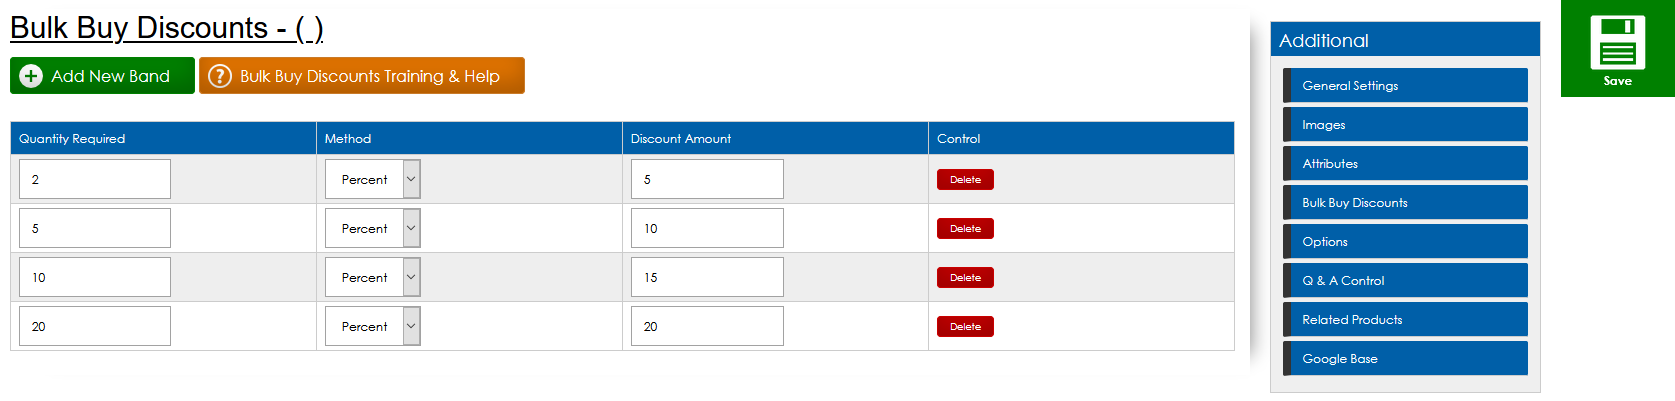
Assign fixed or percentage based discounts to your products which come into effect based on the quantity of the product that they purchase. To edit these settings for this product click "Bulk Buy Discounts" in the "Additional" menu and you will be taken to the editing screen. You will see the option to add a new band. You can enter the quantity threshold at which the discount will come into effect and the amount the individual product price will be reduced by when purchasing above that threshold. You will have the option to set whether this reduction is a percentage or a fixed amount. You also have the option to delete as required.
Product options allow you to define variations of your product that a user can select with optional price differences. A good example of product options is allowing the users to select the size or colour of a product they would like to purchase. You can find a complete guide to managing your product options below.
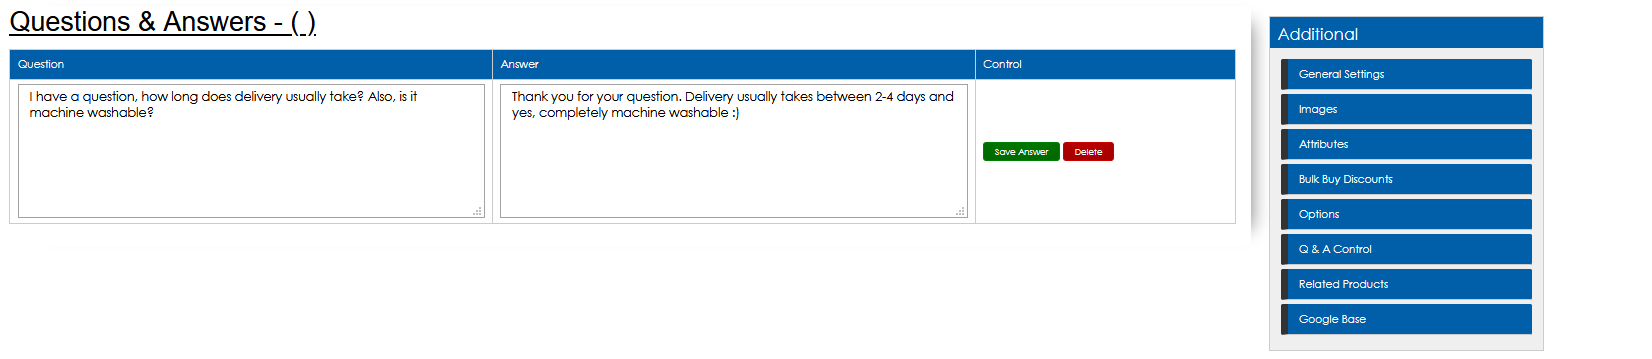
Allow users to submit questions direct to your product page which can be publically displayed along with your answer. A great way to keep an open line of communication with genuine frequently asked questions that will assist other users when browsing your website.
For every question submitted through your product you will recieve an email notification. To access these simply go to the "Additional" menu and select "Q & A Control". You will then see a list of the Questions and the option to submit your answer. Simply fill in your answer and click "Save Answer". Once this is done it will be displayed on the product page on your website for all customers to view. You also have the option to delete questions if required.
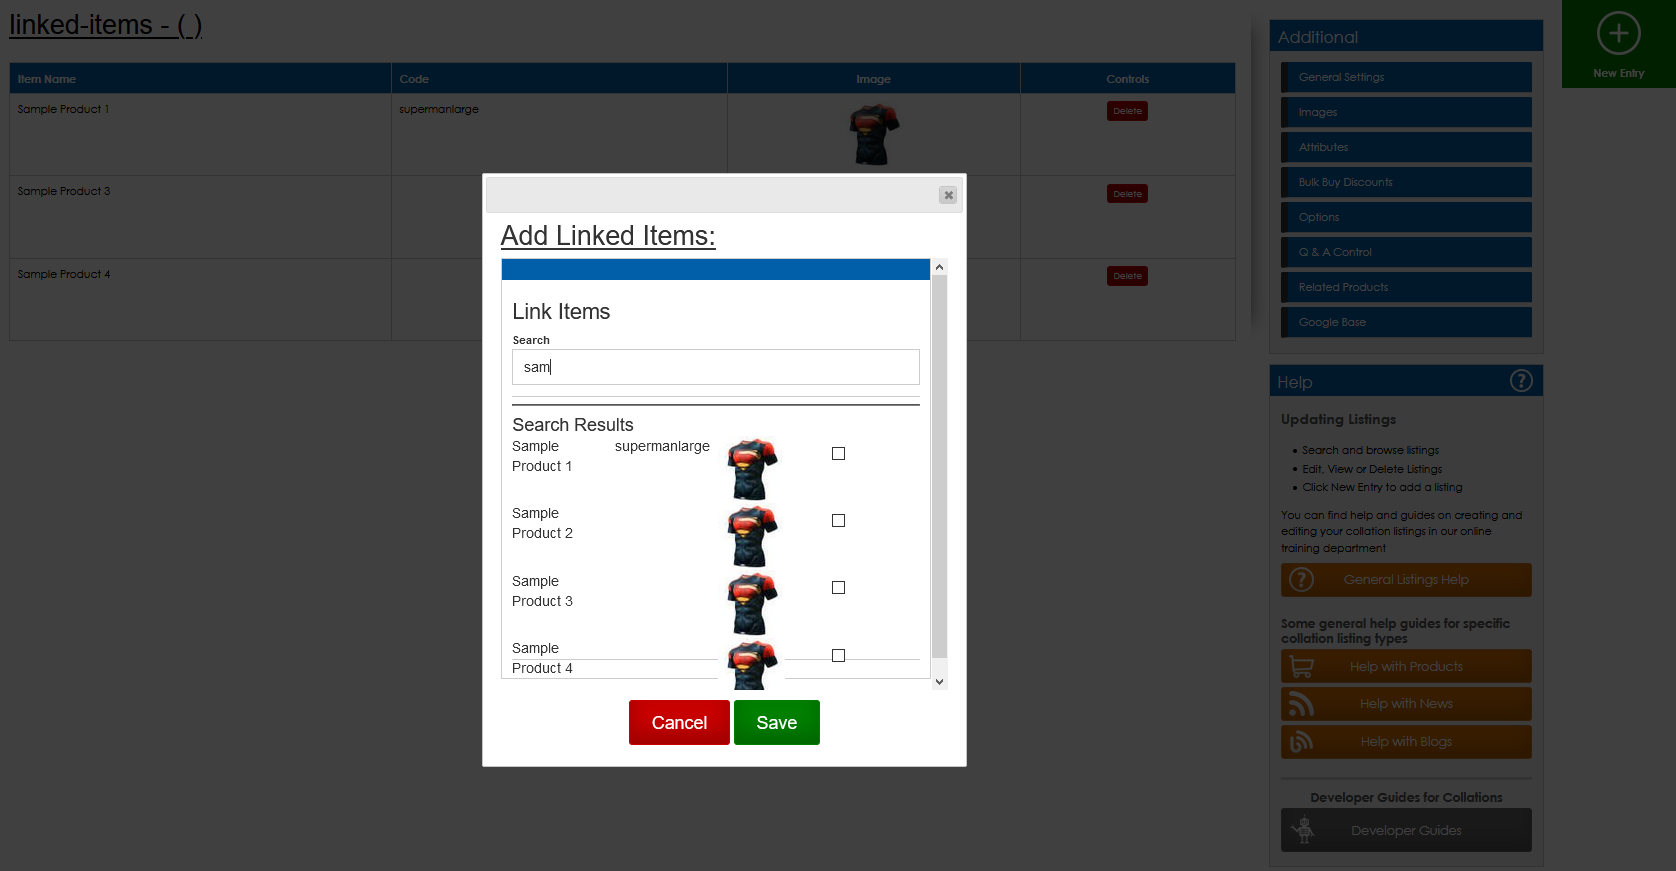
Display related or recommended products to assist your consumers with their online browsing. A great way of providing alternatives and other relevant products that may be of interest to them.
To add and manage related products (linked items) you can go to the "Additional" menu and select "Related Products". Here you will see any items already related. You can click the "New Entry" button which will give you a pop up memenu through which you can search for products and tick to add them as "related content".
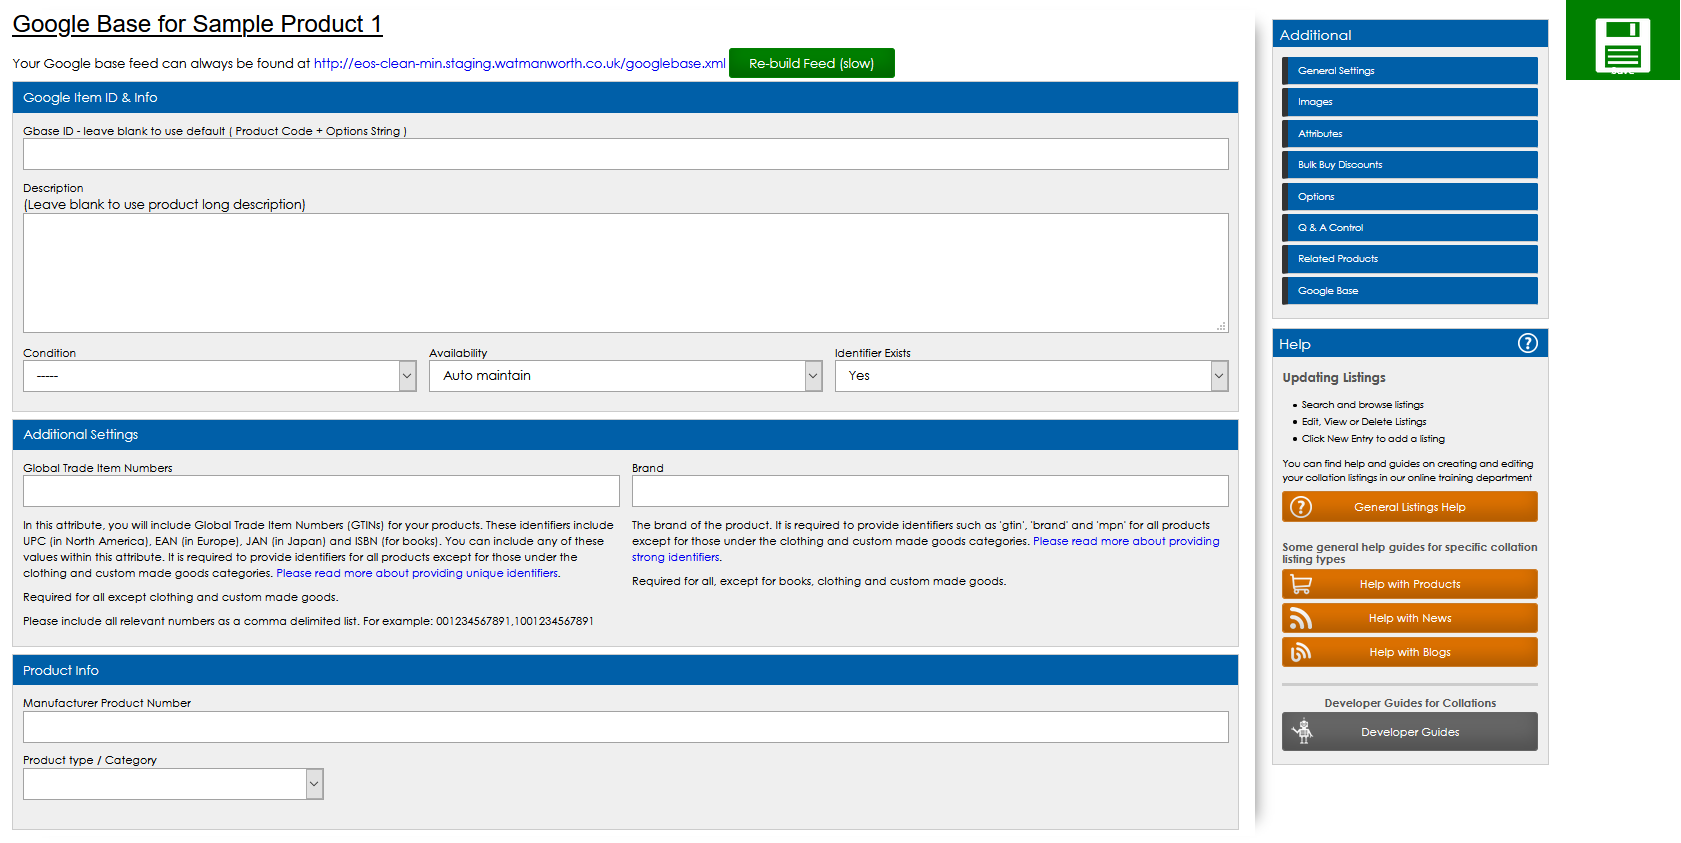
Your website CMS is fully equipt to create your feed to upload and sync to Google Merchant Centre. Simply fill out the required details for your product and it will be included in the feed to add to your Merchant Account. To set this information, go to the "Google Base" tab in the " Additional" menu and follow the instructions, providing all of the required details to get the product listed in the feed.
If your products have a review module enabled you will have an email notification every time a review is submitted. You can manage these reviews by going to the "Content" tab on the main menu and clicking "Manage reviews"
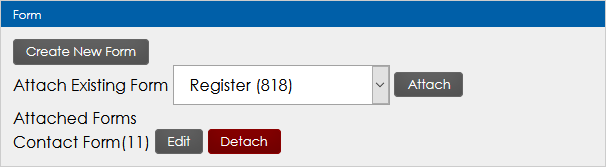
Forms allow users to complete a set of questions/fields that will be sent through to you and respond with an email confirmation to the user. Forms are great for data capture and enquiries. Some page tenplates will enable you to add a form to the page.
Using this control, you can select from the list of available forms you have on your website to attach the chosen form to display on the page. You can create a new form (View Training) or attach an existing one. Once attached, your page will display the forms you have attached to the page.