Stage 1

Web Development Process

Creating the road map to your online success

As with any project, the key to success is planning! This first stage of the Web Rocket is geared to helping you put together a complete action plan for your Digital Marketing Campaign.

Using our FREE Digital Marketing Plan Template, this stage allows you to identify the key areas that you will need to cover when preparing to launch, or build on your online business presence.

Having a solid plan with set goals, metrics, and strategies in place is critical to creating an effective online presence. In this stage of the guide, we will address the key factors that need to be considered and help you formulate these into an actionable plan that will be referred to throughout your campaign.

Createing your Digital Marketing Plan includes;

  • Free downloadable Digital Marketing Plan Template
  • Example Digital Marketing Plan reference
  • Understanding the Digital Marketing Team
  • Writing your Company Overview
  • Establishing Business Goals and Identify Target Audience
  • Understanding and deciding Key Performance Indicators
  • Conducting Competitor & Industry Research
  • Creating an SEO & Content Marketing Strategy
  • Implementing a Social Media & Advertising Plan
  • Creating a Website plan


0/9
 
You have not yet completed this step. Keep going! ;)

Get a FREE Website Quote

The creation of your website - Let's get started!

This stage of the Web Rocket is designed for business owners that are looking to work with a professional web developer to produce their website.

Whilst there are a number of free website building tools available online, working with professional web designers and developers ensures that your website will be built for purpose and benefit from bespoke design and functionality.

This stage takes you through the steps of creating your website brief, hiring a web developer, and what to expect from the development process.

Login to access your downloads

Please log in or create your Web Rocket account to access your resources and downloads. Once logged in, you will be able to view and download all resources and save your progress through the Digital Marketing Guide.

 
Step 1 - Creating your Website Brief

Communicating your website wish list

Before you start looking for web designers and developers, it's important that you have an initial idea of what you hope to achieve from your website project.

A Website Brief is an extended document, including details from your business plan and the website plan you will have made in your digital marketing plan.

Whilst web professionals will be able to build on ideas with you and guide you with the process, it's always helpful to furnish them with an initial concept, your expectations, requirements and preferences. This will enable them to gain a full understanding of what you want to achieve in order to provide you with an accurate proposal and quote for the project.

You may have branding already in place, you may have an existing website, or you may be starting from scratch. Whatever your current circumstance, a website brief is the perfect document to guide your project effectively for both you and your developer.

A website brief should contain

  • An introduction to your company, brand, competitors and target audience. It's essential that potential developers get a feel for who you are and the nature of your business.

  • It is essential to clearly outline all and any services you require. You may require supplementary services such as logo design, branding and SEO. Be sure to list all services required to enable potential agencies to itemise and quote these accordingly.

  • Provide information regarding ideal development and website launch timescales and the budget for the project.

  • Include as much detail as possible about what is required from the website in terms of design, features and functionality. You should add in existing website examples and a full breakdown of what your users should be able to do on your website.

  • Request information from potential developers that you would like them to include in their proposal. This will allow you to fully assess their ability to deliver the product, the total price, ongoing costs and the services provided.

This step is an extremely important one, so we highly recommend that you read our complete guide to producing your website brief >>


Website Brief Resources

 
Step 2 - Hiring a Web Developer

Find a professional web developer to build your website

Next comes the important selection process of finding the right web developer to produce your website. With your website brief ready, you have everything you need to provide a developer or digital agency with everything they need to quote for your project.

You must be confident in an effective working relationship with your web company. They will be an extension of your team in the long term growth of your business and should be able to support you throughout.

Of course, finding the right web developer can be tough. There are 1000s of companies and agencies, all with strengths in different areas, and a very diverse price range for their services.

You'll need to;

  • Know what you need from your website - you've got your website brief - check!
  • Understand how to search, find and assess potential web companies
  • Request a selection of quotes from your chosen agencies
  • Understand how to compare and assess quotes based on your requirements and preferences
  • Know what questions to ask your shortlist of developers to make an informed decision
  • Understand how to confidently finalise your contract and agreement with your chosen developer

In this article, you'll find some guidance and advice for this process - Hiring a web designer in 5 easy steps >>

Writing your company overview


Hiring a Pro - Resources

 
Step 3 - Purchasing your Domain Name

Secure your perfect website address

If you haven't already, you need to make sure you have purchased your domain name. This is the web address that users will visit to view your website, for example: www.watmanworth.co.uk

There are some key considerations you need to keep in mind when choosing your domain name.

Your domain name needs to be;

  • Available for purchase
  • Representative of your business
  • Effective for brand recognition
  • Memorable and easy for users
  • Relevant for search engine optimisation

Google provides some great insight into choosing the right domain name for your business >>

You should brainstorm ideas with your team and come up with a shortlist of appropriate domain names. Try these out with friends, family, colleagues, or even focus groups to gauge the reactions and opinions. Take on board feedback and narrow down your shortlist accordingly.

Once you have selected your domain name, you should purchase and secure it via one of the recommended online providers. You should also liaise with your web developer, as they will most likely have a trade account through which they can register your domain at a reduced cost.

Important: If your web developer registers your domain, it MUST be registered in your name with your details.

Identify your business goals


Domain Name Resources

 
Step 4 - Choosing your Payment Gateway

Taking payments through your website

If you intend to take payments through your website, whether it is selling products, subscriptions, memberships or invoicing for services, you will need a secure, reliable and cost-effective Payment Gateway.

There are a number of options available to you which your web developer will be able to integrate with your website.

You should consider;

  • What are the fees per transaction?
  • Are there monthly contract / termination fees?
  • Are all popular debit / credit cards accepted?
  • How long are funds held before release?
  • Is there strong support provided?
  • Is the integration available with your chosen web developer, and is there an additional cost?

Here, you can get some further information and compare recommended payment gateways >>

We recommend discussing these options with your team and your web developer to decide the right fit for your business and requirements.

Once you have selected your payment gateway, you will need to get your account created early, as there can be significant waits and testing required on your development website.


Key Performance Indicators

Payment Gateway Resources

 
Step 5 - Sharing Files and Assets

A shared workspace for you, your team and your developer to share assets and resources

As your website project kicks off, you're going to need to efficiently collaborate with your developer, sharing files and resources quickly and easily.

Whilst most correspondence can be done via email in terms of communicating responses and feedback, it can often become troublesome when trying to share larger files.

To create an effective shared workspace with communal organised access, we recommend setting up a file share. It's quick, easy and free, and we do this as a course of practice throughout all of our projects.

We can set up folders, for documents, images, raw files, photoshop files, brand assets and website content. Everything can be organised into communal folders which you, your team and your developer can add to and access at any time.

As a fantastic file shared and collaboration solution, we use and recommend Google Drive. All you need to do is login and download Drive with your Google Account >> and you're good to go.

There are also a number of other great file share services available, which you can explore here >>

Once you have your file share account created, simply share access with the required team members, and you're ready to start.

Your developer may have already set up a shared folder, in which case, all you'll need to do is create your account and log in to start sharing.

What should you add to your file share?

As your developer begins work on your website, they will require some initial resources from you, to allow you to see the build of the website in context.

They will already have a great deal of information about your company from your website brief, but they will need some content to get started with.

You should think about adding;

  • Any written content you have, for your home page, about page or service pages
  • A list of categories for products
  • An initial list of service or information pages
  • Any images you would like used on the site, along with a document to detail if you would like any images used for specific pages.

Don't worry about your writing being perfect at this stage. We'll take you through that in the Content & SEO stage of the Web Rocket.

Finding image resources

Not everyone has access to original, unique images for all purposes. You may need to look for inspiration and resources online to find suitable imagery for your website.

Image assets can be costly, as can photography. As much as we encourage everyone to obtain the absolute best imagery possible for your website, it's sometimes necessary to make use of some helpful free resources.

You can find a list of great free image resources websites here >>

 
Step 6 - Company Email Addresses

Get your communications up and running

With your project underway, you can turn your attentions back to your business while your developer gets to work. If you have registered a new domain for the business, you'll want to get your email addresses set up, so you can start communicating under your brand name.

You should identify which email address you would like setting up.

You may just simply need an info@yourdomain.co.uk

Or you may want to set up a selection of email addresses for individual purposes.

For example;

  • info@yourdomain.co.uk or hello@yourdomain.co.uk - for general correspondence and contact forms through the website
  • sales@yourdomain.co.uk or orders@yourdomain.co.uk - for order correspondence and sales enquiries
  • yourname@yourdomain.co.uk - key team members may have dedicated email addresses for a more personal touch to correspondence
  • accounts@yourdomain.co.uk - for general account management purposes

Once you have your domain, you will have the option to set up as many email addresses are required. Speak to your developer to request your email addresses, and then you can add them to your devices such as your computer, laptop, mobile phone or tablets.

Your developer will be able to provide you with details on how to add your emails to various email clients such as Microsoft Outlook, Thunderbird or your smartphone email apps.


Email Resources

 
Step 7 - Creating your Holding Page

Build anticipation with a great "coming soon" page

Your project is in development, your emails are ready to go, and you have your domain active.

Let's not leave that space empty! It's the perfect billboard to let your eager customers know what's coming.

Whilst your website is being worked on, we highly recommend getting a holding page up to communicate to any visitors that your business is coming soon.

Your holding page should be simple, branded and effective. Remember, this is just a teaser page for your forthcoming website, so we just want to give visitors a taste of what is to come.

Your holding page could include;

  • Your company logo
  • Your email address
  • A newsletter or pre-signup form
  • Strong relevant imagery or brand colours
  • A brief description of your services/products
  • A launch date

Your newsletter or pre-signup form allows you to collect visitor contact information. Just simply name and email is enough. This means that when you launch officially, you can do a mail out announcement to let everyone know they can come back and enjoy your fully live website.

Speak to your developer to decide what you would like on your holding page and make sure any visitors are not met with a blank screen.

Get them excited!


Holding Page Resources

 
Step 8 - Review your Website Initial Build

Things are getting exciting!

This is the point where your developer has worked on the creation of your website and is ready for your input.

They will have produced the initial framework, layout and structure. They will have applied your branding, colour scheme, fonts and features. You will be presented with a "staging website" or development link through which you can view the website and start to work your way through the working version in order to provide your initial thoughts and feedback.

Your initial feedback should be directed to the general layout, look and feel of the website. Don't worry if some things aren't fully functional, or you have placeholder text and images. This is an initial review for the benefit of both you and the developer to ensure things are heading in the right direction.

Your initial review and feedback should focus on;

  • The layout, look and feel of the website
  • Are you happy with the application of your branding?
  • Are key elements such as navigation and calls to action clear and prominent?
  • Does the website feel user-friendly?
  • Is it clear what you do as a business, and does the website reflect your company ethos and personality?
  • Are you happy with the fonts, legibility and colour of text?
  • Does the website feel organised, with easy navigation between key areas such as service and product category pages?
  • Is the image placement effective and relevant?

Communicating your feedback

Work through each of those key points and compile a list of feedback to give to your developer on an email. It's always helpful to have a written list to work to.

Your developer will, more than likely, want to chat through with you and discuss the points. It's always great if you can set aside to go through things in more detail, either via a call or in person.

Following your discussions, your web developer will continue to work and implement the agreed feedback on your website.

In the meantime, you can begin to think about collating resources such as written content for your pages, images and service / product information.

You will repeat this process with your web developer as they complete each round of feedback until you are both happy that the website is ready for your content.


Design Review Resources

 
Step 9 - Website Sign Off

Time to take the wheel of your website

Once you have gone through the process of reviewing design and development updates, you will reach the point of website sign off.

This is the stage where both you and your developer are happy and in agreement that the website design and build is complete, and that it's features and functionality fulfil the specification.

  • You should take time to thoroughly check over your website, from the point of view of your audience.
  • Share your development link with your team and review the design and processes together.
  • Review your website on mobile to ensure you are happy with the responsive display
  • Make a list of any issues you come across and give these to your developer

Remember: As part of the website launch, there will be a thorough testing process in which you and your developer will methodically test all aspects of the website in its full completion, with your content added.

Once you are happy that the website is completed to specification, your developer will set you up with administrator log in details and introduce you to your Content Management System.

Your web developer will provide you with training resources and will take you through a 1-2-1 training session to show you through the admin area and how to manage your website content and processes.

The next stage of the Web Rocket takes you through the Website Training Resources for the EOS Content Management System.

If your website has been build on the EOS Website Platform, you can tick to complete this stage when your website is signed off and continue to your training.

If your website has been built on an alternative platform, please request resources direct from your developer.

We still recommend you follow the training stage of the Web Rocket to give you a clear idea of the types of things you should be able to manage within your system.

Sign Off Resources


Web Rocket

Your FREE Digital Marketing Guide

Your very own FREE Digital Marketing Checklist

Are you a new start-up, looking to prepare for your digital marketing journey? Or an existing business ready to review and improve your current online presence?

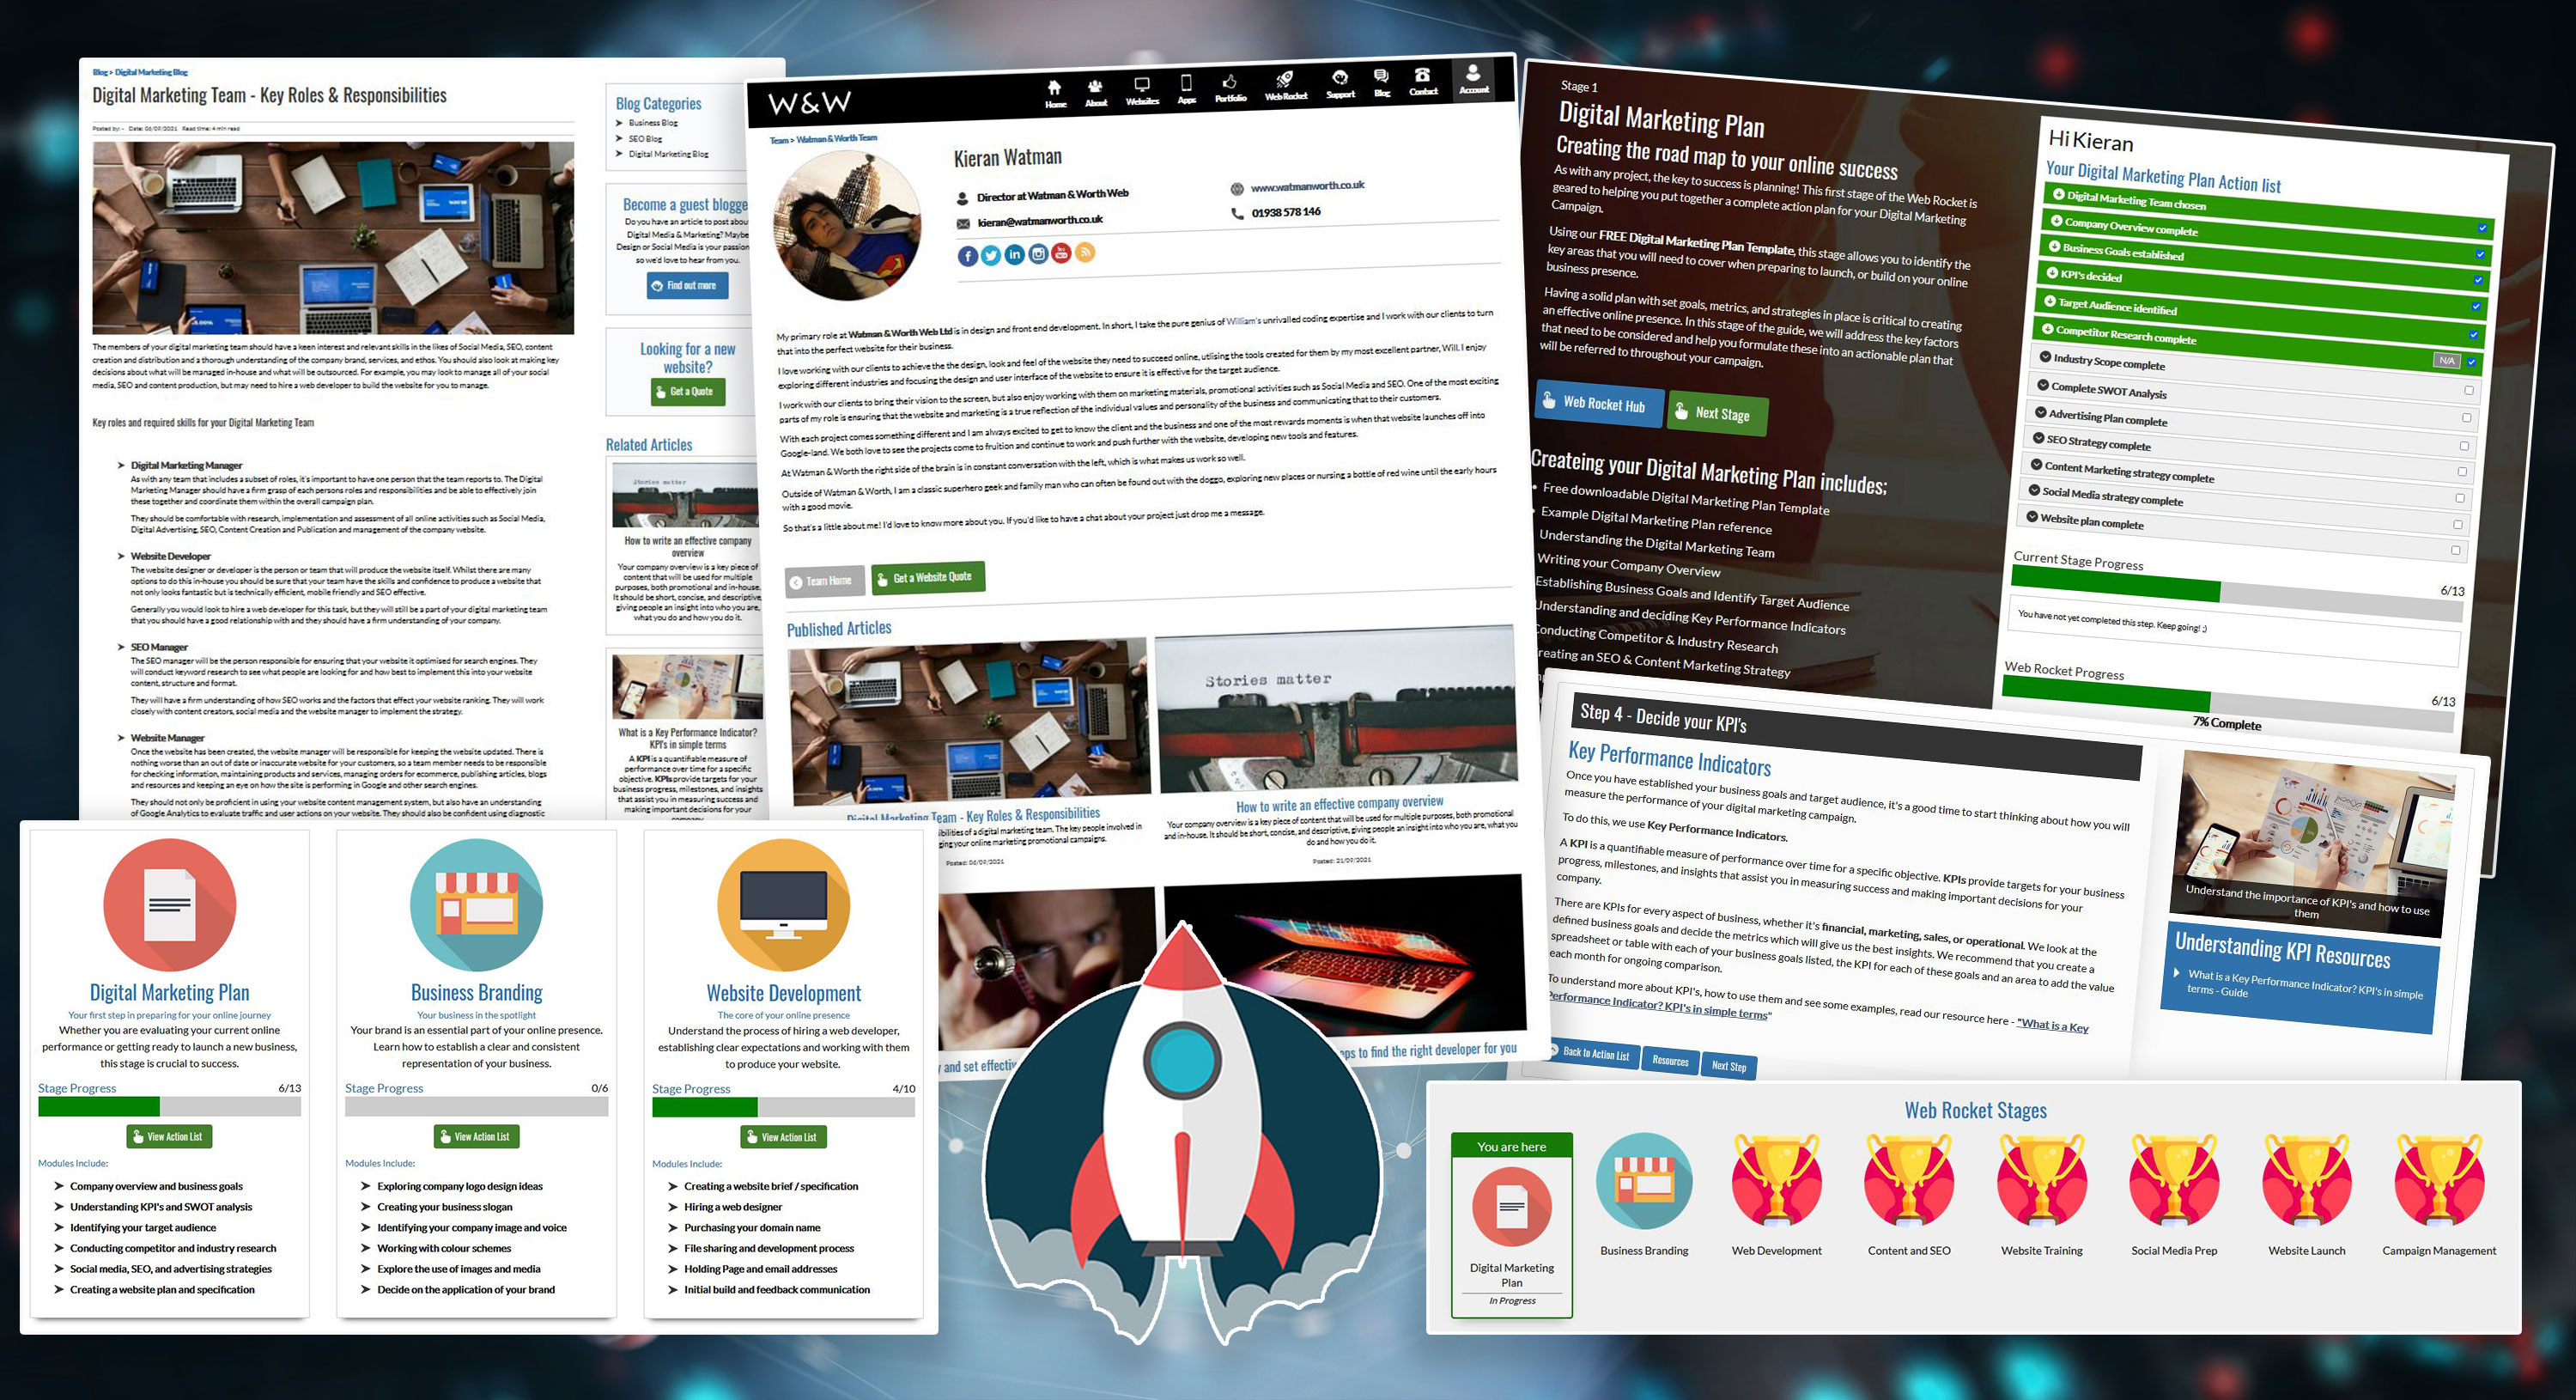
We bring you Web Rocket. An interactive, step by step resource, guiding you through your digital marketing process. This FREE online resource is a collaborative project brought to you by industry professionals, sharing expertise in their relevant fields.

Web Rocket covers every aspect of your Digital Marketing, from preparing your business and branding, to building your website, implementing SEO, and planning your content and social media strategy. We also look at Search Engine Marketing, website analytics, email marketing and much more.

We take you through the process with your personal check list, reading lists, guides and downloadable resources in which you can save your progress as you complete each stage. Web Rocket ensures you cover everything you need to know when getting ready to launch a new business or review your existing presence.


Web Rocket will be launching June 2023 - if you would like to pre-register for the course, please enter your details below and we will email you when your free account is ready to access.


Agree to Terms / Privacy Policy

webrocketicon.jpg

Get a FREE website quote today

Web Rocket Collage

Get involved

The Web Rocket is a collaborative project developed and updated by industry professionals

If you have skills and expertise in the areas covered in the course, we always welcome new contributors to enhance our reader's experience.

The digital marketing landscape is vast, and covers everything from web design, social media and SEO, to photography, printing, and PR. Our readers not only need informative content, but they also will benefit from reliable contacts across the industry.

That's where you come in!

Become a contributor

Do you have expertise in Branding, Design, and Online Promotion? Perhaps a keen understanding of SEO, Content Creation or Search Engine Marketing?
 

Share your expertise

Why not share your knowledge as a featured expert in your field? We will publish your articles, resources, and guides as part of the Web Rocket course for the benefit of our readers.

Key Areas

  • Branding & Design
  • Web Development
  • SEO
  • Content Production & Marketing
  • Social Media
  • Photography & Videography
  • Search Engine Marketing
  • Google Analytics & Campaign Management

As a contributor…

You will be credited for each article, resource, or guide that is published in the Web Rocket Free Digital Marketing Guide.

You will also have your own Author Profile promoting your business & services, along with a link to your website/portfolio.

If you are interested in becoming a contributor, please click below to submit your details.

Become a contributor