Online forms - management and creation

Collect enquiries and data through online forms on your website
Your custom forms are a great way of allowing enquiries and data collections through your website. Creating a form enabling users to submit their information directly to you. Users can submit the form, an email will be sent to you for notification, and an optional email can be sent to the user, confirming their submission.
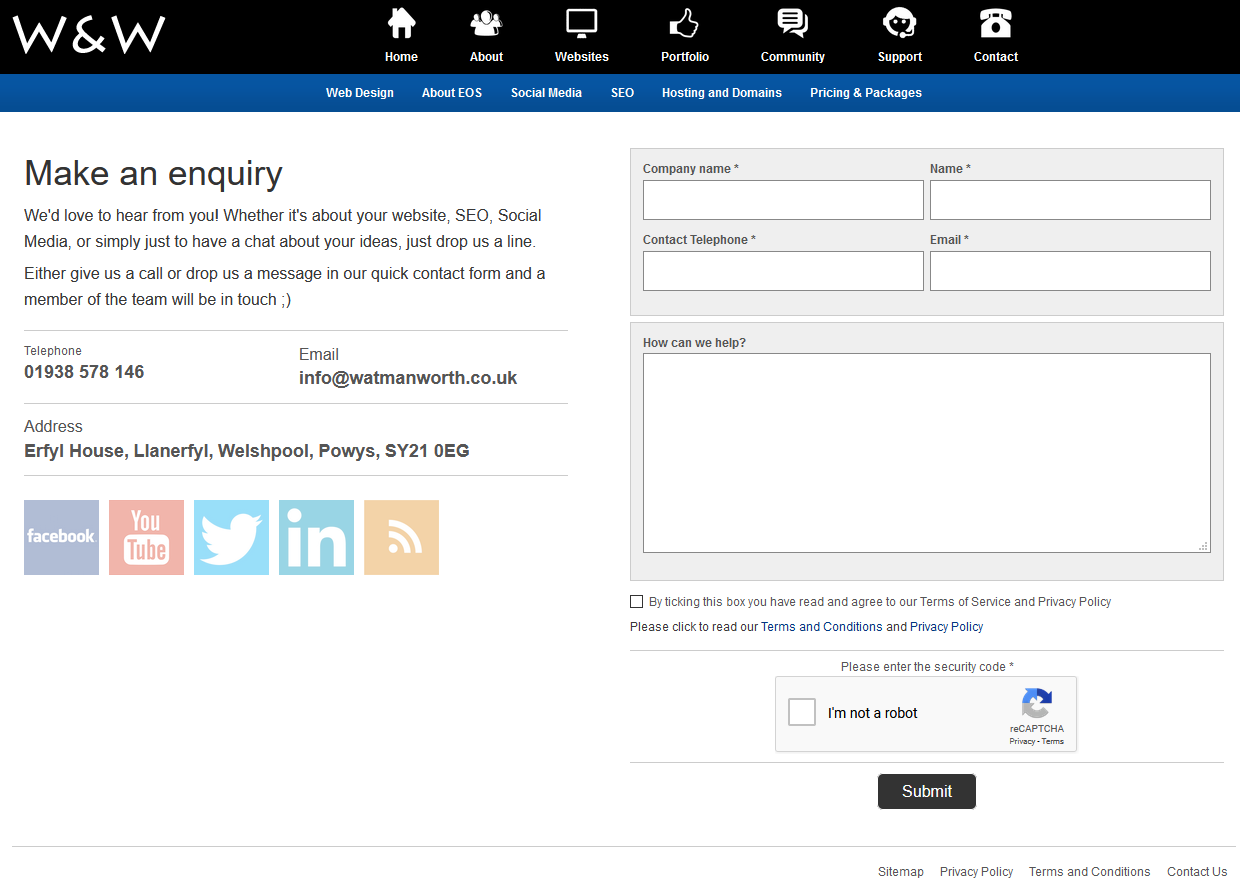
A simple example we will use is the online contact form. Almost every website will have a simple contact form allowing users to submit an enquiry to you.
Here is an example of how the contact form can look on your website (keep in mind, the styling and format will depend on your website and the design that you and your developer have agreed on).
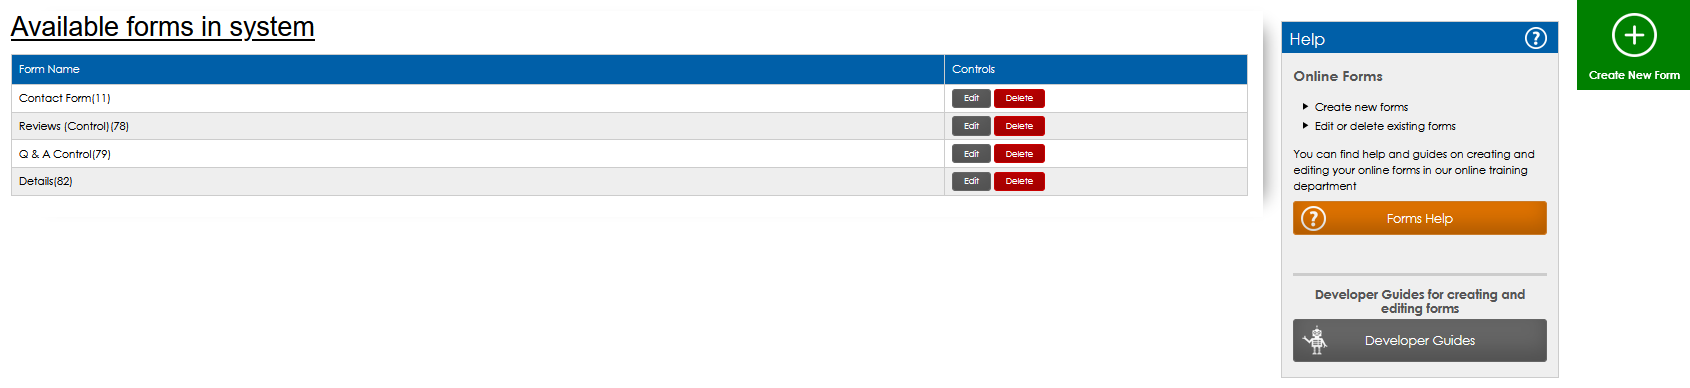
Where are your forms?
To access all of the forms available for your site, you can go to "Tools" on your main menu, then under "Advanced Tools" select "Forms".
Here you will see a list of all of the current forms available and the option to create new ones.
To edit the settings for a form;
- Click "edit" on the form you wish to update
- You will be taken to the Layout Manager for this form. This is a blueprint style layout of the form where you will see the vaious text fields and text entry components that are present on your form.
- Click the green "Config" button on the "Main Config" component
- This will open up the settings for how your form works

Let's take a look at what some of these settings do and the main settings you may want to update.
The submit action allows you to define what you would like to happen with the form data once submitted.
- None - if selected, no action will be taken on submission. This means you will not recieve a notification and no data will be stroed from the form. This option should not be used for standard forms.
- Email - you will recieve an email notification when the form is submitted
- Data collection - no email will be sent to you, but the data will all be collected in your Form Data Reports for you to access and download
- Email and Data Collection - (recommended) - an email notification with the data will be sent to you and the data will be stored in your Form Data Reports.
Submit Action Options
Here you can enter the email address you would like the form and notification to be sent through to. If selected in your Submit Action (above), you will recieve an email notification with the form data attached/included in the email.
If you enter a redirect URL in this setting, when a user submits the form, they will be redirected to the defined page. An example of using this can be a "Thank you" page set up in your custom pages, any other page on your website, or any other website address. You simply enter the URL of the page you would like to direct to, for example /thank-you-for-your-enquiry
This is the template for the email that you, as the admin, will recieve when the form is submitted. You can edit the contents of this email and what information is included from the form, in the email itself.
This is the template for the email that will be sent to the user (if enabled) once they submit their form. It is highly recommended to customise and brand these emails for the best user experience. You can edit the contents of this email and what information is included from the form, in the email itself.
This setting, when ticked, activates the User Response Email to be triggered when the user submits their forms. This is highly recommended to offer further confirmation to the user that their form has been submitted.
This setting attaches the form submitted as a PDF to the admin and response email so there is a download copy of the form data that has been sent.
The submission message will display after the form has been submitted. If you have added a submission redirect (above) this message will be ignored as the user will be directed to the defined page upon submission. This submission message should only be used if you would like the user to remain on the same page after they have submitted their form. If this is the case, you should not enter a submission redirect. You should also tick "Submit via AJAX".
Editing the fields on your form
The fields presented on your form can be edited using the Layout Manager when you edit the form. Fields such as name, email, telephone number etc. So you can completely define the information you would like the user to complete on your form and whether this information is optional or required. In most instances your developer will set up these forms for you, however in the case that you would like to add a new form, or change the criteria of existing ones, you should first have an understanding of the Layout Manager, then carefully read the Form Development Help before you create or modify your form.
Adding a form to a page or listing
If your developer has added the form control to your page or listing layout template you will have the ability to add a custom form to that page. To do so you will simply edit your desired page or listing, select the form you would like to assign to the page, click "Attach" then save and update.
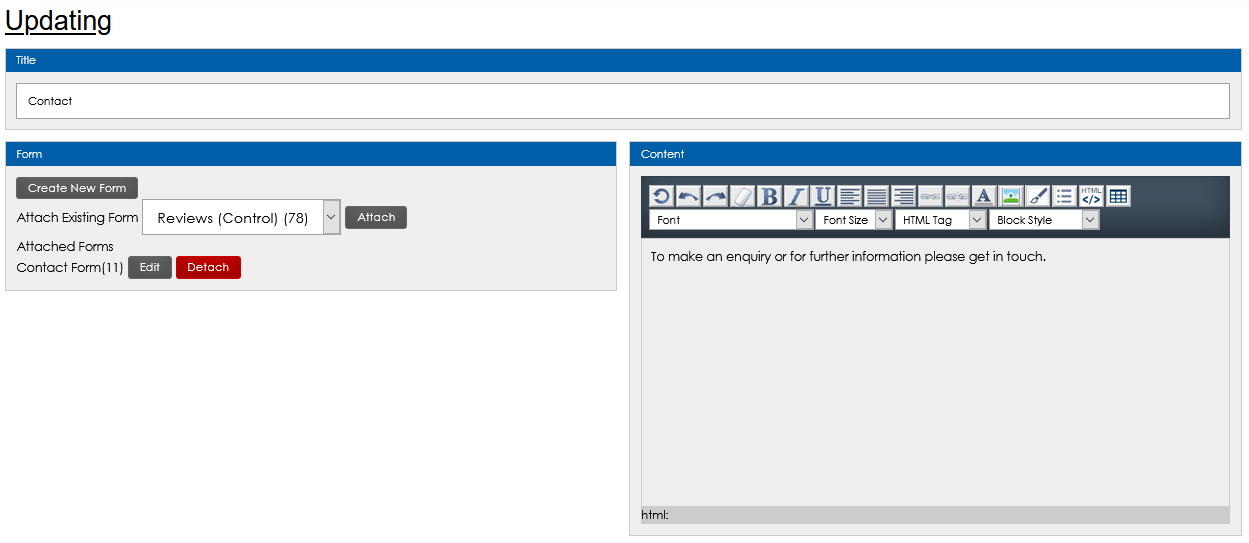
Here you can see an example of editing a page with the form controls available. The contact form has been attached. You have the option to remove, attach a different form, or indeed to create a new form to attach.

Launch your Web Rocket
Take advantage of our FREE Digital Marketing guide.Web Rocket covers every aspect of your Digital Marketing, from preparing your business and branding, to building your website, implementing SEO, and planning your content and social media strategy. We also look at Search Engine Marketing, website analytics, email marketing and much more. Track your progress with your very own Web Rocket Action List, download free templates and resources.